If you hear a whistling sound from your vacuum, it often means there’s an air leak or worn seals. Check for deteriorated foam seals, especially in models like the Sebo X series. Also, inspect for any loose screws or damaged areas where air might escape. This sound can affect performance, so addressing it quickly is essential. Want to know more about common causes and troubleshooting tips? Keep exploring for solutions that can help!
Key Takeaways
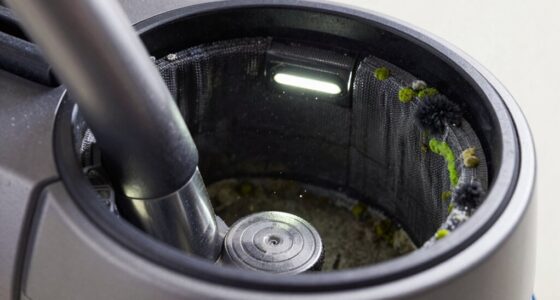
- Whistling sounds from vacuum cleaners often indicate deteriorated foam seals that allow air to escape, particularly in models like the Sebo X series.
- In vehicles, whistling can signal vacuum leaks in the engine intake system due to cracked hoses or loose gaskets.
- Turbocharger or intercooler hose leaks may cause whistling noises under boost, indicating pressurized air escape during acceleration.
- External factors like damaged weatherstripping around doors or windows can produce whistling, misleadingly mimicking engine-related issues.
- Distinguishing between airflow-induced whistling and mechanical noises involves observing sound changes with RPM or load variations.
When you hear a whistling sound from your vacuum cleaner or vehicle, it often signals a problem that needs your attention. This high-pitched noise can stem from various sources, and identifying the culprit can save you time and money. In vacuums, a common issue arises from deteriorated foam seals, particularly in models like the Sebo X series. These seals compress or fall apart over time, allowing air to escape and creating that annoying whistle. You can access and replace the foam seal by removing a couple of screws, depending on your model. Additionally, using energy-efficient cloud solutions can help streamline your troubleshooting process by providing access to resources and information.
In vehicles, whistling noises often indicate vacuum leaks in the engine’s intake system. Cracked or disconnected intake hoses can let high-velocity air bypass the intended paths, producing sharp whistles. Loose or worn intake manifold gaskets can also create gaps, resulting in audible whistling as air flows through. If you notice a whistling sound, take a moment to spray carb cleaner around the hoses and manifold. If you see a change in RPM, you’ve likely pinpointed the leak. Vacuum leaks can lead to rough engine performance and warning lights.
Another potential source of whistling involves turbocharger or intercooler hose leaks. These can emit sounds under boost when pressurized air escapes through small openings. If you hear a whistle while accelerating, check these components for damage or looseness. Don’t forget about vacuum-operated components, such as the EGR valve or brake booster. A failing diaphragm can produce a whistling sound as the engine draws air through tiny openings.
Seals and gaskets can also be a cause. Worn throttle-body or intake-manifold gaskets might lead to whistling where the surfaces fail to seal properly. If you notice wind-induced whistling while driving, it may stem from damaged weatherstripping around windows or doors, rather than engine issues.
Additionally, mechanical components like bearings and belts can produce whistling-like sounds. Worn accessory-belt tensioners or misaligned pulleys might create high-pitched tones mistaken for airflow whistles. To differentiate, pay attention to how the sound changes with RPM or load—true airflow issues often change when you spray suspected areas.
Frequently Asked Questions
Can I Continue Using My Vacuum if It Whistles?
You shouldn’t continue using your vacuum if it whistles. That sound usually signals an underlying issue, like a damaged seal or blockage, which can worsen over time. Ignoring it might lead to reduced performance or even permanent damage. Instead, check for any visible problems, and consider inspecting the seals or hoses. It’s better to address the issue now than risk a more costly repair later.
How Can I Prevent Whistling Noises in My Vacuum?
To prevent whistling noises in your vacuum, regularly check and replace worn seals, particularly around hose connections. Make sure all attachments fit snugly and inspect for cracks or blockages in hoses. Keep your vacuum clean and maintain airflow by emptying dust containers and cleaning filters. Also, periodically tighten screws and connections to avoid air leaks. By staying proactive with maintenance, you’ll help keep your vacuum operating quietly and efficiently.
Are Whistling Sounds Common in All Vacuum Models?
Yes, whistling sounds can be common in many vacuum models. You might notice these high-pitched noises due to air leaks, worn seals, or blockages. As you use your vacuum, keep an ear out for unusual sounds; they often signal something needs attention. Inspect hoses, check seals, and clear any clogs you find. Addressing these issues promptly can help maintain your vacuum’s performance and prevent further complications down the line.
What Tools Do I Need for Vacuum Seal Replacement?
You’ll need a few simple tools for vacuum seal replacement. Start with a screwdriver to remove any screws securing the housing. A pair of pliers can help handle stubborn components. Make sure to have a replacement foam seal ready for installation. If you want precision, a utility knife may be handy for trimming excess material. Finally, keep a clean cloth nearby to wipe down surfaces before reassembly. Happy repairing!
Is It Safe to Ignore a Whistling Sound From My Vacuum?
No, it’s not safe to ignore a whistling sound from your vacuum. That noise often indicates air leaks or blockages, which can reduce suction efficiency and potentially damage the machine over time. If you hear it, check for loose seals or obstructions. Addressing the issue promptly can save you from costly repairs later and ensure your vacuum operates effectively. Don’t wait too long—take a closer look at the problem!
Conclusion
Don’t ignore that whistling sound coming from your vacuum! While it might seem harmless, it can indicate underlying issues that could lead to more significant problems down the line. By addressing it now, you’ll save yourself time and money on repairs. You might think it’s just a quirky feature of your vacuum, but staying proactive guarantees your device runs smoothly and efficiently. So, take a moment to investigate that whistling—your vacuum will thank you!